ref: https://www.digitalocean.com/community/tutorials/how-to-serve-django-applications-with-apache-and-mod_wsgi-on-ubuntu-14-04
以下為網頁備份資料。
How To Serve Django Applications with Apache and mod_wsgi on Ubuntu 14.04
Introduction
Django is a powerful web framework that can help you get your Python application or website off the ground quickly. Django includes a simplified development server for testing your code locally, but for anything even slightly production related, a more secure and powerful web server is required.In this guide, we will demonstrate how to install and configure Django in a Python virtual environment. We'll then set up Apache in front of our application so that it can handle client requests directly before passing requests that require application logic to the Django app. We will do this using the
mod_wsgi Apache module that can communicate with Django over the WSGI interface specification.Prerequisites and Goals
In order to complete this guide, you should have a fresh Ubuntu 14.04 server instance with a non-root user withsudo privileges configured. You can learn how to set this up by running thorugh our initial server setup guide.We will be installing Django within a Python virtual environment. Installing Django into an environment specific to your project will allow your projects and their requirements to be handled separately.
Once we have our application up and running, we will configure Apache to interface with the Django app. It will do this with the
mod_wsgi
Apache module, which can translate HTTP requests into a predictable
application format defined by a specification called WSGI. You can find
out more about WSGI by reading the linked section on this guide.Let's get started.
Install Packages from the Ubuntu Repositories
To begin the process, we'll download and install all of the items we need from the Ubuntu repositories. This will include the Apache web server, themod_wsgi module used to interface with our Django app, and pip, the Python package manager that can be used to download our Python-related tools.To get everything we need, update your server's local package index and then install the appropriate packages:
sudo apt-get update
sudo apt-get install python-pip apache2 libapache2-mod-wsgi
Configure a Python Virtual Environment
Now that we have the components from the Ubuntu repositories, we can start working on our Django project. The first step is to create a Python virtual environment so that our Django project will be separate from the system's tools and any other Python projects we may be working on.We need to install the
virtualenv command to create these environments. We can get this using pip:sudo pip install virtualenv
virtualenv installed, we can start forming our
project. Create a directory where you wish to keep your project and
move into the directory:mkdir ~/myproject
cd ~/myproject
virtualenv myprojectenv
myprojectenv within your myproject directory. Inside, it will install a local version of Python and a local version of pip. We can use this to install and configure an isolated Python environment for our project.Before we install our project's Python requirements, we need to activate the virtual environment. You can do that by typing:
source myprojectenv/bin/activate
(myprojectenv)user@host:~/myproject$.With your virtual environment active, install Django with the local instance of
pip by typing:pip install django
Create and Configure a New Django Project
Now that Django is installed in our virtual environment, we can create the actual Django project files.Create the Django Project
Since we already have a project directory, we will tell Django to install the files here. It will create a second level directory with the actual code, which is normal, and place a management script in this directory. The key to this is the dot at the end that tells Django to create the files in the current directory:django-admin.py startproject myproject .
Adjust the Project Settings
The first thing we should do with our newly created project files is adjust the settings. Open the settings file with your text editor:nano myproject/settings.py
At the bottom of the file, we will add a line to configure this directory. Django uses the
STATIC_ROOT
setting to determine the directory where these files should go. We'll
use a bit of Python to tell it to use a directory called "static" in our
project's main directory:STATIC_ROOT = os.path.join(BASE_DIR, "static/")
Complete Initial Project Setup
Now, we can migrate the initial database schema to our SQLite database using the management script:cd ~/myproject
./manage.py makemigrations
./manage.py migrate
./manage.py createsuperuser
We can collect all of the static content into the directory location we configured by typing:
./manage.py collectstatic
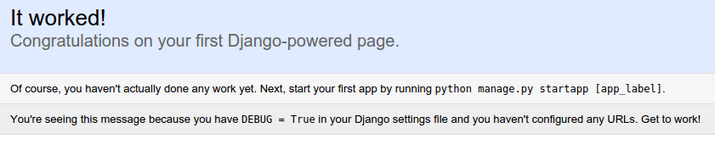
static within your project directory.Finally, you can test your project by starting up the Django development server with this command:
./manage.py runserver 0.0.0.0:8000
:8000:http://server_domain_or_IP:8000
If you append
/admin to the end of the URL in the
address bar, you will be prompted for the administrative username and
password you created with the createsuperuser command: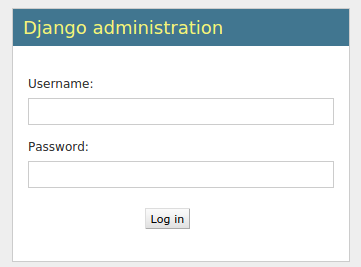
After authenticating, you can access the default Django admin interface:

When you are finished exploring, hit CTRL-C in the terminal window to shut down the development server.
We're now done with Django for the time being, so we can back out of our virtual environment by typing:
deactivate
Configure Apache
Now that your Django project is working, we can configure Apache as a front end. Client connections that it receives will be translated into the WSGI format that the Django application expects using themod_wsgi module. This should have been automatically enabled upon installation earlier.To configure the WSGI pass, we'll need to edit the default virtual host file:
sudo nano /etc/apache2/sites-available/000-default.conf
To start, let's configure the static files. We will use an alias to tell Apache to map any requests starting with
/static
to the "static" directory within our project folder. We collected the
static assets there earlier. We will set up the alias and then grant
access to the directory in question with a directory block:
    . . .

    Alias /static /home/user/myproject/static
user wsgi.py file within the
second level project directory where the Django code is stored. To do
this, we'll use a directory section with a file section inside. We will
grant access to the file inside of this nested construct:
    . . .

    Alias /static /home/user/myproject/static
user WSGIDaemonProcess directive to set this up.This directive takes an arbitrary name for the process. We'll use
myproject
to stay consistent. Afterwards, we set up the Python path where Apache
can find all of the components that may be required. Since we used a
virtual environment, we will have to set up two path components. The
first is our project's parent directory, where the project files can be
found. The second is the lib/pythonx.x/site-packages
path within our virtual environment folder (where the Xs are replaced
by the Python version number components). This way, Apache can find all
of the other Python code needed to run our project.Afterwards, we need to specify the process group. This should point to the same name we selected for the
WSGIDaemonProcess directive (myproject in our case). Finally, we need to set the script alias so that Apache will pass requests for the root domain to the wsgi.py file:
    . . .

    Alias /static /home/user/myproject/static
user Wrapping Up Some Permissions Issues
If you are using the SQLite database, which is the default used in this article, you need to allow the Apache process access to this file.To do so, the first step is to change the permissions so that the group owner of the database can read and write. The database file is called
db.sqlite3 by default and it should be located in your base project directory:chmod 664 ~/myproject/db.sqlite3
www-data group, group ownership of the file:sudo chown :www-data ~/myproject/db.sqlite3
sudo chown :www-data ~/myproject
sudo service apache2 restart
Conclusion
In this guide, we've set up a Django project in its own virtual environment. We've configured Apache withmod_wsgi to handle client requests and interface with the Django app.Django makes creating projects and applications simple by providing many of the common pieces, allowing you to focus on the unique elements. By leveraging the general tool chain described in this article, you can easily serve the applications you create from a single server.